Cụm sấy máy in HP P3015
Giá: 3.700.000 ₫
Cụm sấy máy in HP P3015 chính hãng giá rẻ nhất, dùng cho máy in HP LaserJet P3015 / P3015n / P3015d / P3015dn / P3015x
Để lại số điện thoại, chúng tôi sẽ gọi lại ngay, Cảm ơn!
Đánh giá 1 lượt đánh giá
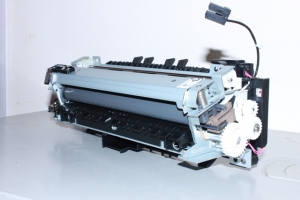
Cụm sấy máy in HP P3015 Fuser Assembly 220V chính hãng
Dùng thay cho các máy in
Máy in HP LaserJet Enterprise P3015d Printer (CE526A)- Chuyên in giấy CAN ( Calque)
Máy in HP LaserJet Enterprise P3015 Printer (CE525A)
Máy in HP LaserJet Enterprise P3015dn Printer (CE528A)
Máy in HP LaserJet Enterprise P3015x Printer (CE529A)
Máy in HP LaserJet Enterprise P3015d Printer (CE526A)- Chuyên in giấy CAN ( Calque)
Máy in HP LaserJet Enterprise P3015 Printer (CE525A)
Máy in HP LaserJet Enterprise P3015dn Printer (CE528A)
Máy in HP LaserJet Enterprise P3015x Printer (CE529A)
Siêu Tốc nhận thay linh kiện máy in HP P3015 chính hãng bao gồm: bao lụa, rulo ép, thanh sấy, mỡ bao lụa. Giải pháp tiết kiệm chi phí so với thay nguyên bộ cụm sấy HP LaseJet P3015 mới, chất lượng tương đương với cụm sấy mới HP P3015.
Công ty Siêu Tốc còn cung cấp dịch vụ sửa chữa máy in HP LaserJet P3015, nạp mực, đổ mực, bơm mực và thay mực in HP 55A tận nơi TPHCM.
Ngoài ra, Công ty Siêu Tốc nhà cung cấp thiết bị máy văn phòng Chính hãng, Máy đếm tiền và Soi tiền giả, Máy in, Mực in, Băng mực, Laptop – Máy tính xách tay, Máy tính bàn PC – Máy chủ Server. Chúng tôi đảm bảo về chất lượng hàng chính hãng và giá thành sản phẩm tốt nhất với Khách Hàng.
Mọi chi tiết liên hệ Hotline/Whatsapp/Wechat/Skype/Zalo: +84913859859
Instructions on the fuser removal Procedure for the HP P3015 Printers
In this article I’d like to give you the instructions for the fuser removal in these machines. While it’s nice to have some one perform this procedure for you, it can save you money to perform this on your own. While this is not as easy as removing a fusing assembly in a HP P4015, I believe it can be done with a few easy to understand instructions and some pictures to guide you along the way.
Fuser Removal – HP P3015
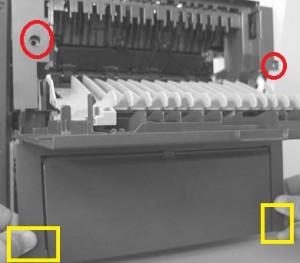
Rear – Door Assembly
1. Open the rear door
2. Pull it down till it’s at a 90 decree angle from the back on the machine
3. Push up on the link arm to release it. Then remove two screws on either side of the door opening
4. Open the dust cover rear door and release the tabs on either side of on the bottom corners.
5. Pull the rear door assembly out at the bottom then pull it down and away from the machine.

Các bước thay Cụm sấy máy in HP P3015

Các bước thay Cụm sấy HP P3015
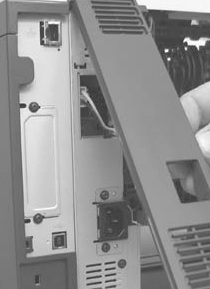
Right Rear Cover HP P3015 Fuser Assembly
1. Pull the cover left and then pull out and away from the back of the machine.
Media Feed Guide HP P3015 Fuser Assembly
1. Release two tabs and pull the media guide out the back.

Các bước thay Cụm sấy máy in HP Laserjet P3015 chính hãng

Các bước thay Cụm sấy máy in HP P3015 Fuser Assembly 220V chính hãng
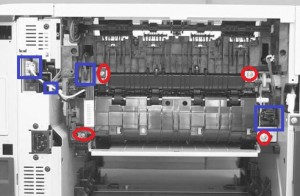
HP P3015 Fuser Assembly – RM1-6274-000
1. Release the three wires connectors and release the AC power cable from the retaining clip on the left side.
2. Remove the four screws on each corner of the fusing assembly
3. Make sure the cartridge door is open to avoid fuser damage and pull the fusing assembly out the back of the printer.
Alright hopefully that helped you figure out the fuser removal procedure in these machines. If you have any questions leave a comment below.
Người gửi / điện thoại
CÔNG TY TNHH ĐIỆN TỬ VIỄN THÔNG TIN HỌC SIÊU TỐC
Địa chỉ: 05 đường số 26, Linh Đông, Thủ Đức, TPHCM
Mã số thuế: 0310903403
VP Đồng Nai: Xã Phú Túc, Huyện Định Quán
VP Đồng Nai: Xã Xuận Bắc, Huyện Xuân Lộc
VP Hà Nội: Tây Mỗ, Nam Từ Liêm
Về chúng tôi
Copyright © 2011 mayinsieutoc.com.vn All rights reserved


